USE GUIDE
DOWNLOAD FILE HEREHOW TO ENABLE NFC ON IOS AND ANDROID OPERATING SYSTEMS 2
ENABLE NFC ON IOS OPERATING SYSTEM 2
How to enable NFC on iPhone 8 Plus and earlier 2
How to enable NFC on iPhone X and later 3
ENABLE NFC ON ANDROID OPERATING SYSTEM 4
GUIDE TO UPDATING RCARD BUSINESS CARD INFORMATION ON MOBILE DEVICES 5
GUIDE TO WRITING DATA TO RCARD VIA NFC 7
How to write data to rCard by iPhone 7
How to write data to rCard by Android device 9
NFC (Near Field Communication) is a wireless technology that enables fast and convenient data transfer between devices within a very short range. With the rCard equipped with NFC technology, you can perform various actions such as electronic payments, data sharing, and connecting with other devices without the need for cables or Wi-Fi connections. Below is a comprehensive user guide to help you make the most of your rCard experience.
HOW TO ENABLE NFC ON IOS AND ANDROID OPERATING SYSTEMS
ENABLE NFC ON IOS OPERATING SYSTEM
List of iPhone Models Supporting NFC Read/Write:
- iPhone 7 and iPhone 7 Plus (requires iOS 11 or later).
- iPhone 8 and iPhone 8 Plus.
- iPhone X and newer models, including iPhone XR, XS, 11, 12, 13, 14, and beyond.
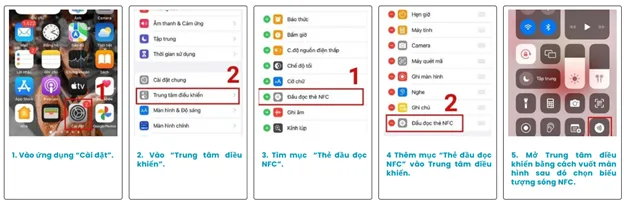
How to Enable NFC on iPhone 8 Plus and Earlier
For iPhone 8 Plus and earlier models, you can add the NFC function to the Control Center to use NFC on your iPhone. Follow these steps:
Step 1: Go to the “Settings” app.
Step 2: Navigate to “Control Center.”
Step 3: Find the “NFC Tag Reader” option.
Step 4: Add the “NFC Tag Reader” to the Control Center.
Step 5: Open the Control Center by swiping the screen > Select the NFC wave icon.
 How to Enable NFC on iPhone 8 Plus and Earlier
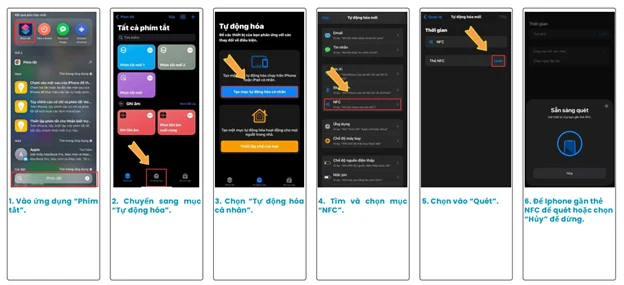
How to Enable NFC on iPhone X and Later
For iPhones with the notch design from the iPhone X and later, the NFC function is enabled to work passively on the device, so you do not need to add it to the Control Center. You can follow these steps to use this feature:
Step 1: Open the “Shortcuts” app.
Step 2: Tap “Automation.”
Step 3: Select “NFC” in the Personal Automation section.
Step 4: Find and select the NFC option.
Step 5: Tap “Scan.”
Step 6: Hold the iPhone close to the NFC card to scan or select “Cancel” to stop.
 How to Enable NFC on iPhone X and Later
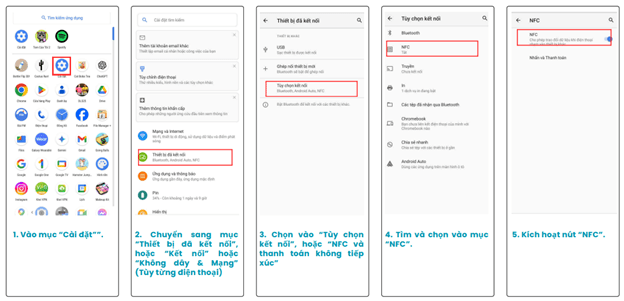
ENABLE NFC ON ANDROID OPERATING SYSTEM
Step 1: Go to “Settings.”
Step 2: Navigate to “Connected Devices,” “Connections,” or “Wireless & Networks” (Depending on your device).
Step 3: Select “Connection Preferences” or “NFC and Contactless Payments.”
Step 4: Find and select “NFC.”
Step 5: Toggle the “NFC” switch to enable it.
 How to Enable NFC on Android
After enabling NFC, you can try using features such as Google Pay, scanning NFC tags, or transferring files via NFC to ensure the NFC function is active.
Note:
NFC may not be available on all Android devices. Older devices might not support this feature.
If you cannot find the NFC option in settings, try searching for “NFC” in the settings search bar.
GUIDE TO UPDATING RCARD BUSINESS CARD INFORMATION ON MOBILE DEVICES
Ensure that your phone’s NFC feature is enabled. If not, please refer to the guide on How to Enable NFC on iOS and Android.
Step 1: Bring the rCard close to your phone; a link to the card information page will appear.
Step 2: Scroll to the bottom of the card information page and select “Edit.”
Step 3: The login page will appear. Enter your account information, including email and password, then select “Log In.”
 How to update information on rCard (1)
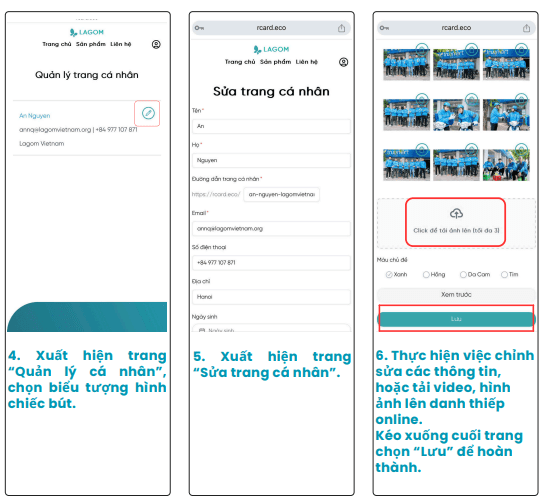
Step 4: On the “Personal Management” page, select the pencil icon.
Step 5: The “Edit Personal Page” screen will appear.
Step 6: Edit the information or upload videos and images to the online name card. Scroll down and select “Save” to complete the process.
How to update information on rCard (2)
GUIDE TO WRITING DATA TO RCARD VIA NFC
Note: The NFC antenna area varies by phone model. You may need to move the rCard around the back of your phone to find the correct area, which is usually located on the back of the phone.
How to write data to rCard by iPhone
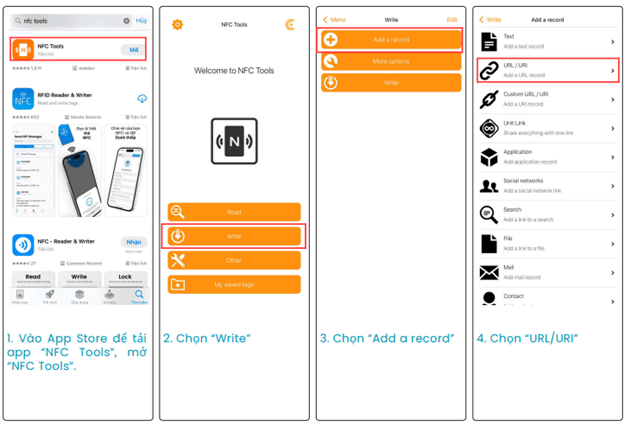
Step 1: Download and open the “NFC Tools” app from the App Store.
Step 2: Select [Write] to start writing to the card.
Step 3: Choose [Add a Record] to add data.
Step 4: Select [URL/URI] to write the link to your personal page.
 How to write data to rCard by iPhone (1)
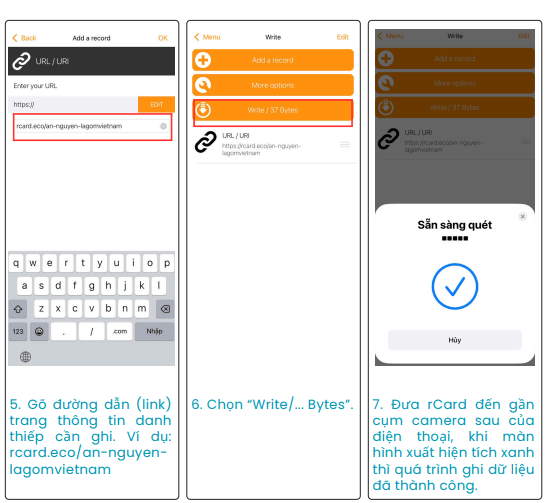
Step 5: Enter the link to the name card you want to write.
Step 6: Select “Write/... Bytes.”
Step 7: Bring the rCard close to the rear camera of the phone. When a green checkmark appears on the screen, the data writing process is successful.
 How to write data to rCard by iPhone (2)
How to write data to rCard by Android device
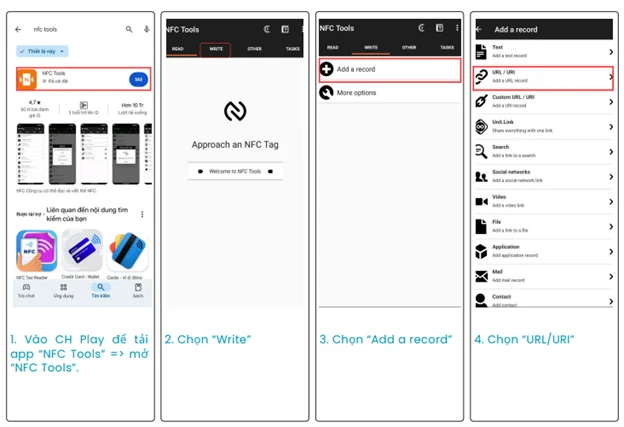
Step 1: Download and open the “NFC Tools” app from Google Play.
Step 2: Select [Write] to start writing to the card.
Step 3: Choose [Add a Record] to add data.
Step 4: Select [URL/URI] to write the link to your personal page.
 How to write data to rCard by Android device (1)
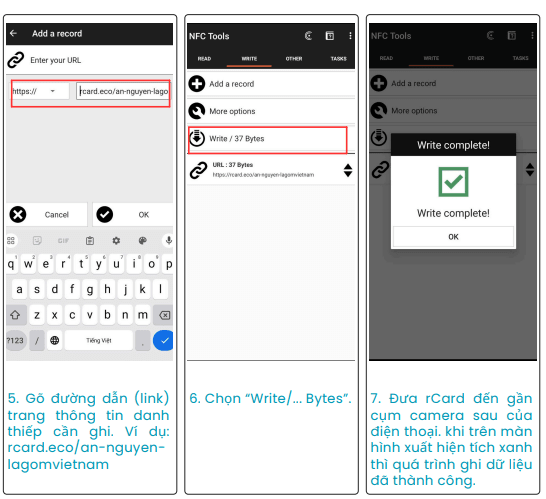
Step 5: Enter the link to the name card you want to write.
Step 6: Select “Write/... Bytes.”
Step 7: Bring the rCard close to the rear camera of the phone. When a green checkmark appears on the screen, the data writing process is successful.
 How to write data to rCard by Android device (2)
We hope this guide helps you make the most of your rCard. If you have any questions regarding the usage process, please contact us for support:
- Mobile/Zalo/WhatsApp: 0977107871 or Hotline: 0828810081
- Email: [email protected]